Microsoft Internet Information Services
CORE can be integrated with Microsoft Internet Information Services ("IIS"- https://www.iis.net/).
The following sections describe how to issue a web server certificate using a key pair generated and secured with CORE.
Prerequisites
You need the following prerequisites for integration with CORE:
- Microsoft IIS version 8.0 .
- For UKC client software release 1901 and earlier:
Copy ekmpkcs11.dll, ssleay32.dll, libeay32.dll from the CORE installation folder to the system32 directory.
Create the Certificate Authority
After installing CORE, create a new CA. Setting up the CA involves installing the CA feature and configuring it. Information about how to do this task can be found here:
If there is an existing CA, use the following instructions to migrate it for use with CORE:
- Back up the CA private key.
For instructions, see https://support.microsoft.com/en-us/help/298138/how-to-move-a-certification-authority-to-another-server, in the section Windows Server 2003 > Step 2: Use the Certification Authority snap-in to back up the CA database and private key. - Back up the rest of the CA configuration.
- Import the pfx to CORE.
- Reinstall the CA.
- Choose the certificate that has a corresponding private key in the CORE.
- If re-installation is done on a new server, it is required to run
ucl sync-cert -localfirst.
- If re-installation is done on a new server, it is required to run
- Restore the rest of the CA configuration.
Set up the SSL Certificate
You can either import an existing SSL![]() Secure Sockets Layer - a cryptographic protocol that provides communications security over a computer network. certificate or you can create a new certificate.
Secure Sockets Layer - a cryptographic protocol that provides communications security over a computer network. certificate or you can create a new certificate.
Option 1: Import a certificate into CORE
If you already have a certificate, use the following procedure to import it into CORE:
- Back up the CA private key. See here for more information.
- In the Certification Authority snap-in, right-click the CA name, click All Tasks, and then click Back up CA to start the Certification Authority Backup Wizard.
Click Next, and then click Private key and CA certificate.
Click Certificate database and certificate database log.
Use an empty folder as the backup location. Make sure that the backup folder can be accessed by the new server.
Click Next. If the specified backup folder does not exist, the Certification Authority Backup Wizard creates it.
Type and then confirm a password for the CA private key backup file.
Click Next, and then verify the backup settings. The following settings should be displayed:
Private Key and CA Certificate
Issued Log and Pending Requests
Click Finish.
- Back up the rest of the CA configuration.
- Import the .pfx file to CORE.
- Reinstall the CA.
- Choose the certificate that has a corresponding private key in the CORE.
- If the re-installation is done on a new server, it requires first running
ucl sync-cert -local.
- If the re-installation is done on a new server, it requires first running
- Restore the rest of the CA configuration.
Option 2: Create a new certificate
Create an Unbound KSP “Web Server” Certificate Template
To issue a certificate using Unbound as the key provider, you first need to create a duplicate of the Web Server certificate template.
- Open the Certification Authority snap-in.
- Right-click on Certificate templates and then click Manage.
- Right-click on
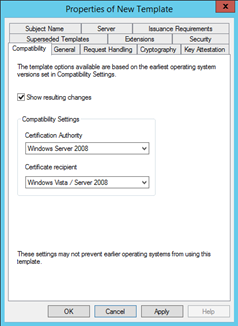
Web Serverand choose Duplicate Template. - In the Compatibility tab, set the following values:
- Certification Authority:
Windows Server 2008 - Certificate recipient:
Windows Vista / Server 2008
Accept the “resulting changes” message, if prompted.
- Certification Authority:
- In the Cryptography tab, set the following values:
- Provider Category:
Key Storage Provider - In the Choose which cryptographic providers can be used for requests, choose
Requests must use one of the following providers. - In the Providers choose only
Dyadic Security Key Storage Provider. - In the Request hash, choose
SHA256.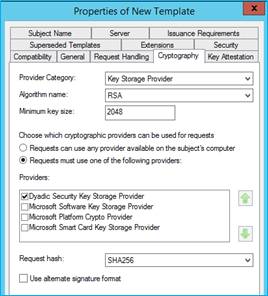
- Provider Category:
- In the General tab, under Template Name, set the name to
Unbound Web Server. - In the Security tab, add the machine hostname you are working on, and select
Allowunder the Enroll permission. - Click OK to save the new certificate template.
- Go back to the Certification Authority snap-in, right-click on Certificate Templates, click New > Certificate Template to Issue.
- Choose
Unbound Web Serverand click OK.
Create a Web Server Certificate
Use the following procedure to create the SSL![]() Secure Sockets Layer - a cryptographic protocol that provides communications security over a computer network. certificate for IIS:
Secure Sockets Layer - a cryptographic protocol that provides communications security over a computer network. certificate for IIS:
- Open MMC and add the Certificates snap-in for Computer account.
- Expand Personal > Certificates.
- Right-click on Certificates and select Request New Certificate.
- In the Select Certificate Enrollment Policy, click Next.
- Check the
Unbound Web Servercertificate template and click on More information is required to enroll this certificate. Click here to configure settings. - Under Subject name choose
Common nameas the type and enter the name of the certificate you would like to create (For example,www.mydomainname.com). Then click Add and OK. - Click Enroll.
- Click Finish.
The SSL![]() Secure Sockets Layer - a cryptographic protocol that provides communications security over a computer network. certificate and private key are generated and secured in the CORE system.
Secure Sockets Layer - a cryptographic protocol that provides communications security over a computer network. certificate and private key are generated and secured in the CORE system.
Choose the Certificate
To add the CORE server certificate to the CORE client:
- Open the IIS snap-in and expand the server node. Choose Sites. Choose the web site you wish to protect (By default, it is “Default Web Site”).
- In the right pane, under Actions, click Bindings…
- Click Add and set the binding as follows:
- Type: HTTPS.
- Hostname: The CORE server DNS hostname (which is the same hostname as configured on the certificate).
- SSL
 Secure Sockets Layer - a cryptographic protocol that provides communications security over a computer network. Certificate: Choose the created certificate.
 - Click OK and close.
- Open SSLSecure Sockets Layer - a cryptographic protocol that provides communications security over a computer network. Settings.
- Select Require SSLSecure Sockets Layer - a cryptographic protocol that provides communications security over a computer network..
- Click Apply.
The web site is now configured for SSL![]() Secure Sockets Layer - a cryptographic protocol that provides communications security over a computer network., using a certificate and key protected by CORE.
Secure Sockets Layer - a cryptographic protocol that provides communications security over a computer network., using a certificate and key protected by CORE.
Run the Solution
Verify the SSL![]() Secure Sockets Layer - a cryptographic protocol that provides communications security over a computer network. installation and inspect the signing events:
Secure Sockets Layer - a cryptographic protocol that provides communications security over a computer network. installation and inspect the signing events:
- Make sure that the server hostname is resolvable to the IIS server IP address in your DNS server by browsing to the IIS web site. For example:
- Inspect the SSLSecure Sockets Layer - a cryptographic protocol that provides communications security over a computer network. signing events in the CORE event log, which can be found here:
https://www.mydomainname.com
C:\Program Files\Dyadic\ekm\tomcat\logs\ekm.log