Google Cloud KMS Keys
GCP CryptoKey
A GCP CryptoKey represents a group of keys that serve a specific cryptographic purpose.
Members of the group are identified as CryptoKey versions. Each version represents a distinctive key material and the associated algorithm. For example, a CryptoKey created for cryptographic signing may contain unalike keys, such as RSA and ECC![]() Elliptic-curve cryptography - an approach to public-key cryptography based on the algebraic structure of elliptic curves over finite fields. In practice, cryptographic key rotation keeps all the rotated keys in one group.
Elliptic-curve cryptography - an approach to public-key cryptography based on the algebraic structure of elliptic curves over finite fields. In practice, cryptographic key rotation keeps all the rotated keys in one group.
A cryptographic operation in GCP must detail the CryptoKey's version. Yet, some management commands may address the whole group by specifying the CryptoKey's name only.
References:
GCP Key Types
The following table summarizes supported KMS![]() Key Management System key types and BYOK
Key Management System key types and BYOK![]() Bring Your Own Key/non-BYOK
Bring Your Own Key/non-BYOK![]() Bring Your Own Key key creation options.
Bring Your Own Key key creation options.
| Key type | Size/Curve | BYOK | non-BYOK |
|---|---|---|---|
| RSA | 2048, 3072, 4096 | √ | √ |
| ECC |
P256, P384, SECP256K1 | √ | √ |
| AES | 256 | √ | √ |
| HMAC |
Note
CORE does not support external HMAC![]() Hash-based Message Authentication Code - A MAC involving a cryptographic hash function and a secret cryptographic key. keys.
Hash-based Message Authentication Code - A MAC involving a cryptographic hash function and a secret cryptographic key. keys.
GCP Crypto Operations and Algorithms
References:
- GCP Create and Validate Signatures
- GCP Encrypt & Decrypt using AES key
- GCP Encrypt & Decrypt using RSA key
The following table summarizes UID-based crypto operations supported by AWS KMS![]() Key Management System.
Key Management System.
| Key type | Decrypt | Encrypt | Sign | Verify |
|---|---|---|---|---|
| RSA | √ | √ | ||
| ECC |
√ | |||
| AES | √ | √ |
Note
To perform an operation that requires a public key (encrypt, verify), a GCP user must obtain the public key from the KMS![]() Key Management System and perform the required operation using tools available to the user.
Key Management System and perform the required operation using tools available to the user.
Users of CORE can obtain a public key by using the export command in UI or UCL![]() Unbound Command Language. UCL
Unbound Command Language. UCL![]() Unbound Command Language commands that require a public key (e.g.,
Unbound Command Language commands that require a public key (e.g., ucl encrypt) obtain the required public key by themselves without the exporting step.
The following list summarizes KMS![]() Key Management System algorithms that can be used via CORE . Algorithms not supported by CORE are
Key Management System algorithms that can be used via CORE . Algorithms not supported by CORE are [shaded].
- RSA
-
- rsa_decrypt_oaep_
- 2048_sha256
- 3072_sha256
- 4096_sha256
4096_sha512-
- rsa_sign_pss_
- 2048_sha256
- 3072_sha256
- 4096_sha256
4096_sha512- rsa_sign_pkcs1_
- 2048_sha256
- 3072_sha256
- 4096_sha256
4096_sha512- ECC
 Elliptic-curve cryptography - an approach to public-key cryptography based on the algebraic structure of elliptic curves over finite fields
-
- ec_sign_
- p256_sha256
- p384_sha384
- secp256k1_sha256
- AES
-
256. Mode: GCM. Padding: Cloud KMS
Key Management System-internal metadata. - HMACHash-based Message Authentication Code - A MAC involving a cryptographic hash function and a secret cryptographic key.
-
hmac_sha256
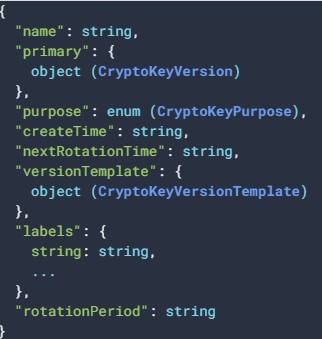
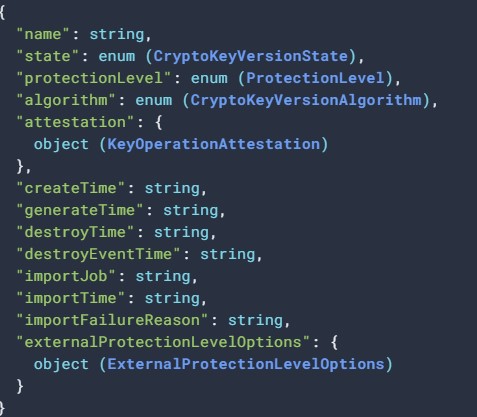
GCP CryptoKey Metadata
Metadata of a crypto key comprises the shared 'main' part and, for each version, its specific data. The main part specifies the group's purpose, its 'primary' key and rotation settings. While all group members share the purpose, each group member may be set to fulfill the goal using different cryptographic algorithm.
| Main metadata | Version-specific metadata |
|
See the description here |
See the description here |
GCP Key Management Operations
The following table compares CORE and KMS![]() Key Management System key management options and references KMS
Key Management System key management options and references KMS![]() Key Management System documentation for further details.
Key Management System documentation for further details.
| Operation | CORE | GCP | Comment / Differences | Reference |
|---|---|---|---|---|
| Generate | √ | √ |
|
|
| Import | √ | √ |
|
|
| Key Policy | √ |
|
||
| Delete/Destroy | √ | √ |
|
|
| Cancellation of Delete | √ |
|
||
|
Activate / Revoke |
√ |
|
|
|
| Enable | √ | √ |
|
|
| Disable | √ | ≈ |
|
|
| Rekey | √ | ≈ |
|
|
| Get Info | √ | √ |
|
|
| Get Public | √ | √ |
|
Get Public Key |
| Get Private | √ |
|
Note: The ≈ sign indicates the availability of alternatives.
GCP Quickstart
In this quickstart, we prepare GCP keyring and use it from CORE:
- In GCP:
- Create a service account and obtain its credentials.
- Create a keyring and obtain its ID.
- In CORE:
- Create a partition that allows linking to external keystores.
- Extend the partition by attaching to it the above keyring.
- Generate RSA key in the keyring.
- Use the key in the crypto command.
Steps on GCP
In this step, we create a new GCP project and enable it to use KMS![]() Key Management System API. Then, in the project, we create a service account that will serve our partition and permit it using key management and crypto commands.
Key Management System API. Then, in the project, we create a service account that will serve our partition and permit it using key management and crypto commands.
Create KMS Project
- Sign in to Google Cloud Console.
- Create a new project (name:
ub-kms)- In the Select a project dialog, click the NEW PROJECT button.
- Create a new project in your organization. We will call it ub-kms.
- Switch to the new project - you are presented with its dashboard. Examine its content:
- The Project info shows your Project ID: ub-kms.
- The list of API is empty. Notice the Explore and Enable APIs in the Getting Started box.
- The list of Resources is empty. But notice the Manage Resources button in the Quick Access panel.
- Also, notice the IAM Permissions button in the Quick Access panel.
- Enable use of KMSKey Management System API in this project:
- Click Explore and Enable APIs in the Getting Started box.
- APIs and Services page is presented with APIs enabled by default. In the top panel, click +ENABLE APIS and SERVICES button.
- In the presented Search form, enter KMSKey Management System.
- Click on the presented Cloud Key Management Service (KMSKey Management System) API button and then click Enable.
- You are presented with the Cloud Key Management Service API page. In the top panel, you see the following note "To use this API, you may need credentials. Click 'Create credentials' to get started.". Follow the recommendation and click the 'Create credentials' button.
Create Service Account
- Create a service account ID for this project (
test-ub@ub-kms.iam.gserviceaccount.com)- You are forwarded to the Credentials topic on the APIs and Services page.
- In the Which API are you using? dialog, select Cloud Key Management Service (KMSKey Management System) API.
- In the What data will you be accessing? , select "Application data".
- Answer "No" to the Are you planning to use this API with Compute Engine?, and click Next.
- You are forwarded to the Service Accounts topic in the IAM and Admin page and prompted to name the service account. Let's name it
test-ub. The given name produces the Service account ID:test-ub@ub-kms.iam.gserviceaccount.com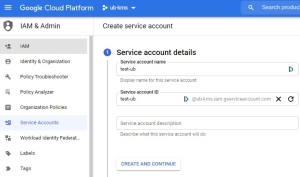
- In the Grant this service account access to project select the following roles (by typing KMSKey Management System in the Filter field):
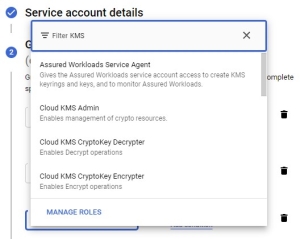
- Cloud KMSKey Management System Admin (Enables management of crypto resources).
- Cloud KMSKey Management System CryptoOperator (Enables all Crypto Operations).
- Cloud KMS
- Click Done, and you are returned to the API and Service page.


Obtain the Account's Credentials
- In the Service Accounts section of the page, click the email address for the service account you created just now.
- Click Keys in the Top panel.
- Click ADD KEY and choose to Create new key option.
- Select the JSON option.
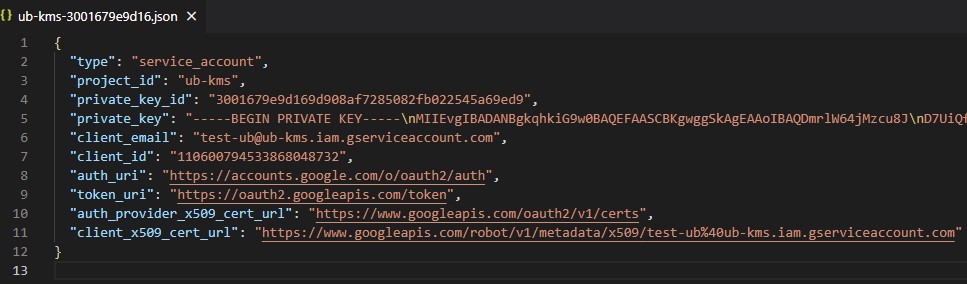
- The private key and the following metadata regarding this service account are saved to your computer.
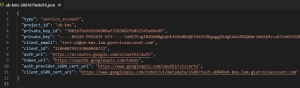
- Convert credentials JSON file to the format required by CORE .
- Delete all new-line characters from this file.
- Encode the new file using Base-64 encoder without adding new-line chars (
-w 0) .
tr -d "\n" < ub-kms-3001679e9d16.json > ub-kms.json
base64 -w 0 ub-kms.json > ub-kms-secret.b64
Note
On MacOS, usebase64 ub-kms.json > ub-kms-secret.b64. See here.
Create Keyring
Create a keyring that will be linked from our partition:
- From your project console, select the Security tab and click Key Management.
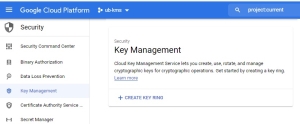
- Click
+ CREATE KEY RING.- Enter the keyring name - for example,
test-kr. - Enter its location - for example,
us-east1.
- Enter the keyring name - for example,
- Click Create.
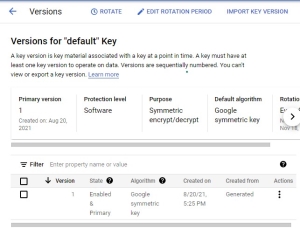
- You are instantly asked to create a key, so let's follow the recommendation and create a key by name "default", leaving all the rest of the parameters at their default settings.
- Click Create. We just added the symmetric encrypt and decrypt key that has the "Software" Protection level. By clicking on the key name, we can check its parameters.
- Click actions and select Copy resource name. The result is
projects/ub-kms/locations/us-east1/keyRings/test-kr/cryptoKeys/default/cryptoKeyVersions/1. We will need to link to the key from CORE .


Summary of What We Created in GCP
| Value | |
|---|---|
| Location | us-east1 |
| Keyring name | test-kr |
| Example of a Key ("default") in the keyring | projects/ub-kms/locations/us-east1/keyRings/test-kr/cryptoKeys/default/cryptoKeyVersions/1 |
| Service Account | test-ub@ub-kms.iam.gserviceaccount.com |
| Account's permissions |
Cloud KMS |
| Account's credentials | ub-kms-secret.b64 |
Also, on your computer, you have a secret key for the account in the Base64 encoded file - ub-kms-secret.b64.
Steps on CORE
Create Partition
The Root SO![]() Security officer - UKC partition administrator role.:
Security officer - UKC partition administrator role.:
- Creates a partition (hereon named "test").
- Allows attaching external keystores to the partition. See Create New Partition.
Attach the Keyring
The partition's SO![]() Security officer - UKC partition administrator role.:
Security officer - UKC partition administrator role.:
- Sign-in to "test" partition.
- Open the Keystores section. If you don't see this option, return to Create Partition.

- Click Add keystore
- Specify an arbitrary name. We will use the keyring's name.
- Use the description as needed.
- DO NOT checkmark "Deploy as an external service".
- Leave Sync policy at its default setting (NONE).
- Click Set new credentials
- Skip Access key ID.
- Secret key - Paste the content of the ub-kms-secret.b64 file.
- Skip Access key ID.
- Click Add parameter to specify the keyring using key-value pairs:
- Key-name - location.
Value - us-east1. - Key-name - keyring_id.
Value - test-kr. Save this parameter.
Save this parameter and click Add parameter.
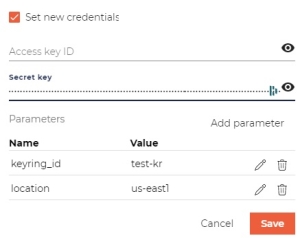
- Key-name - location.
- Click Create keystore.
The expected result is: the keystore appears in the list of the keystores. Its status is RUNNING.


Link to External Key
Link to the key created in the keystore.
- Navigate to Keys and Certificates.
- Hover over the
+ Createbutton and select the Link option. The Link key dialog is presented.- Keystore name, in our case, is already preselected.
- External ID -
projects/ub-kms/locations/us-east1/keyRings/test-kr/cryptoKeys/default/cryptoKeyVersions/1(see Summary of What We Created in GCP). - Skip other fields and click Link. A new key is created in the partition.
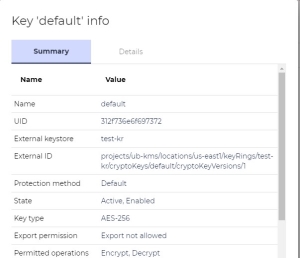
- Check the result. You should see that the GCP Symmetric key for encryption/decryption resulted in an AES 256 key with the same permissions.

Run Crypto Command
Test encryption and decryption of the linked UID.
- To test the linked key using CURL, create a user that has a password.
Let's assume that the new user's name isuser1and its password isPassword1!. - Let's also assume that the hostname of EP is
ep1. - Use UID 312f736e6f697372 to encrypt "Hello GCP".
curl -k -X POST 'https://ep1/api/v1/keys/312f736e6f697372/encrypt?partitionId=test'\
-u user1@test:Password1! \
-H 'Content-Type: application/json' -d '{"clearText": "Hello GCP"}'
{"cipherTextBase64":"CiQADAKdArx39FSXGTefqYxQ4fr62/W1n7xBPjLMbqLcNOvxLu8SMgDV2+uuekM+IDCCKjMqWq7\
TTytwp3tDFl1Lrsv26r5jG2XlYi30xPH7RXI0O8LtEOCa"}