Keystore Sync Service
A CORE partition SO![]() Security officer - UKC partition administrator role. has two options to synchronize keys in its partition with the changes that occurred in external keystores attached to the partition:
Security officer - UKC partition administrator role. has two options to synchronize keys in its partition with the changes that occurred in external keystores attached to the partition:
- Manual update:
- Use the UI link command to add a link to a new key in the keystore.
- Use the UI relink command to update the existing key.
- Automatic update:
- Launch the partition's key-sync service. It is a scheduled job, that runs periodically according to the specification provided on its launch. The default interval is 30 minutes. The minimum period is one minute.
- Control the synchronization scope by managing the
sync policyof each keystore specified in the partition's configuration (see Edit Keystore): NONE- do not synchronize this keystore (default). The sync service makes no changes in the partition.
ONLY_LINKED_KEYS- as needed, re-sync already linked keys.
ALL_ACTIVE_KEYS- 1. as needed, re-sync already linked keys.
- 2. link to the new keys that were created in the external keystore.
Note
The key-sync service withholds from synchronizing the CORE keys with the deleted, destroyed, or revoked keys in the external keystore.You must explicitly perform the corresponding CORE command to synchronize CORE with the deleted, destroyed, or revoked external keys.
Key-sync Bot
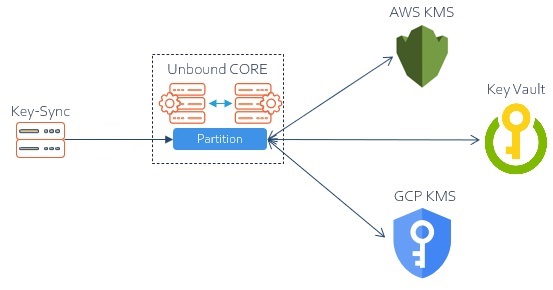
The CORE key-sync service is a bot deployed as a docker container. It can run on any device that provides Docker services and can connect to EP server. Each instance of a container takes care of one CORE partition. It handles all keystores attached to the partition. Each keystore is synced according to is sync policy.
The credentials of the key-sync bot are authenticated by EP. The scope of actions of the bot is restricted by a permissions assigned to its service account (user credentials). The minimum set of permissions required to perform its task contains the following: link, relink, get, and list.
The bot never contacts external keystores directly. It keeps no data related to the keystore. All interactions with the external keystores are carried by the CORE partition's backend.
Quorum
To permit uninterrupted automatic update, do not enable the partition's Quorum approval for the Link and Relink commands.
Key-sync Quickstart
In the following quickstart, we assume the following:
- CORE:
- Partition "test" has attached external keystores.
- Key-sync host server:
- Docker is installed, and the Docker daemon is running.
Launching the key-sync service involves the following steps:
- CORE:
- Registering the service in the partition.
- Obtaining its authentication and authorization artifacts.
- Key-sync host server:
- Uploading the above authentication and authorization artifacts.
- Deploying the key sync image.
- Preparing configuration.
- Launching the service.
Steps on CORE
We create artifacts that will permit the key-sync service to access test partition:
ks-sync-test.pfx, Password1!
Register the service with the partition and generate the access certificate that the service will use. Note, we use the same procedure as the one that creates a FULL client.server-ca.p7b
Obtain the certificate that will be used by the service to validate the EP identity:ks-sync-bot, Password2!
Create the service account (user) that will permit the service to act in the partition:
Important
The certificate's file name must include the name of the partition. For example, ks-sync-test.pfx.
ucl client create -p test --name ks-sync --mode FULL -o ./ks-sync-test.pfx --pfx_password Password1!
Client ks-sync created successfully, client certificate file is ~/ks-sync-test.pfx
ucl root_ca -o ./server-ca.p7b
Root CA saved successfully in ~/server-ca.p7b
ucl user create --name ks-sync-bot --user_password Password2! --role user -p test --user so --password ********
User ks-sync-bot created successfully
Note
For simplicity, we assigned the user role and permissions to ks-sync-bot. By default, this role permits all crypto operations.
In production, ks-sync-bot should be granted the least privileges to perform the sync task: permission to perform link, relink, get, and list commands.
Summary
We generated the following artifacts that will be used to configure the key-sync service:
| Artifact | Type | Password | Description |
server-ca.p7b
|
file | none | CA certificate that will be used to validate the EP server's identity |
ks-sync-test.pfx
|
file | Password1!
|
Service certificate that permits the key-sync service to access the test partition
|
ks-sync-bot
|
name | Password2!
|
Service credentials that grant the service the permissions to perform key synchronization |
Steps on Key-sync Host
We use the key-sync distribution and the artifacts we made in Steps on CORE to launch the service:
- Create a directory that will host the service files. For example, ~/ks-sync.
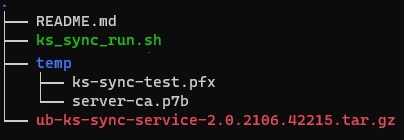
- Obtain the
ub-ks-sync-service-<release>.tar.gzfile and unzip it to this directory. The directory shall includeREADME.mdandks_sync_run.shfiles. As needed, make the script runnable. - Create the temp subdirectory and upload to it files created in Steps on CORE. The ~/ks-sync folder looks as this:
- To launch the service, run the
ks_sync_run.shwith the following parameters:-l <URL of EP server>.-p <Partition name>
Name of the partition that the key-sync shall sync.- key-sync bot credentials in the partition (see Steps on CORE):
-u <User>
Name of the user in the partition that acts on behalf of this bot.-w <User Password>
Its password.
-k <The key-sync certificate's password>.[-i <Keystore sync interval>]
Duration (in seconds) of the pause between two key-sync service runs. Default: 30 minutes (1800). The minimal value: one minute (60 )
As noted above, the name of the partition must also appear in the name of the partiton's certificate file (PFX
 An archive file format for storing cryptography objects using Base64 encoding).
For example, let's create a bot that runs every 5 minutes:
- Examine the container's status
sudo sh ks_sync_run.sh -l "https://ep1:443" -p test -u ks-sync-bot -w Password2! -k Password1! -i 300
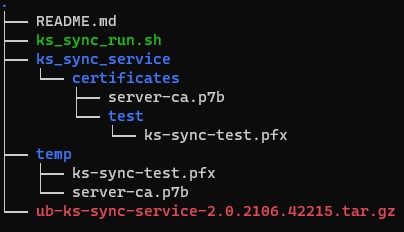
The script copies the certificates from the temp folder to directories that the container will mount and use, pulls the image, and starts the container. The ~/ks-sync now contains the "service" subtree with the structure required by the running container.
The name of the ks-sync-test.pfx file is used to name the container:
Executing docker run with name=ks-sync-test,image=unboundukc/ukc-ks-sync:<tag>
docker ps -a
CONTAINER ID IMAGE ............................... NAMES
f70b1c802f48 unboundukc/ukc-ks-sync .............. ks-sync-test
Key-sync Control
To stop, start and check the status of the key-sync service, use Docker commands for container control:
docker ps -a - display all existing containers and their status.
docker start CONTAINER_ID - start an existing container.
docker stop CONTAINER_ID - stop an existing container.
docker rm CONTAINER_ID - remove an existing container.
To track container's logs, use:
docker logs --follow CONTAINER_ID
Modifying Key Sync Parameters
To modify the key-sync interval, stop the container, remove it, and relaunch with the new parameter. For example, to change its rate from once in 5 minutes to once in one hour:
- Stop the key-sync container:
- Remove it:
- Start the service with the new time interval (3600 secs):
docker stop <CONTAINER_ID>
docker rm <CONTAINER_ID>
sudo sh ks_sync_run.sh -l "https://ep1:443" -p test -u ks-sync-bot -w Password2! -k Password1! -i 3600
Syncing multiple partitions
As noted above, a single key-sync bot operates in the partition specified by the ks_sync_run.sh -p <name-of-partition>. You may deploy additional bots on the same server. To deploy a key-sync bot for additional partition:
- Follow the steps in Steps on CORE on the new partition. Make sure that the file name
ks-sync-<name-of-partition>.pfxindeed contains the name of the partition. - Follow the steps in Steps on Key-sync Host starting with step #3 (upload the
ks-sync-<name-of-partition>.pfxto the temp folder). - Start the a new container
sudo sh ks_sync_run.sh -l "https://ep1:443" -p <name-of-partiton> -u ks-sync-bot -w Password2! -k Password1! -i <seconds>
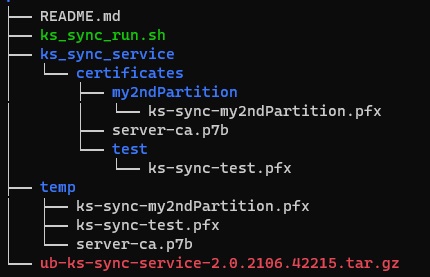
For example, if the new partition is my2ndPartition then
before step #3 we will see the following files in the temp folder:

and after step#3 the structure will show
and we shall see the additional container
docker ps -a
CONTAINER ID IMAGE ............................... NAMES
f70b1c802f48 unboundukc/ukc-ks-sync .............. ks-sync-test
35c08d23fb88 unboundukc/ukc-ks-sync .............. ks-sync-my2ndPartition
Testing the Service
- Use Edit Keystore to set the partition's sync policy to
ALL ACTIVE KEYS. - Login to the cloud provider, navigate to the keystore, and generate a new key
K1. - After the interval parameter, list the partition's keys.
- The new key should appear in the partition.
- Change the partition's policy to
ONLY_LINKED_KEYS. - Using the keystore's UI, create a new key
K2and disable theK1. - After the interval parameter, list the partition's keys.
- The new key should not appear in the partition.
K1status should change to disabled.