Web Interface
CASP![]() Unbound’s Crypto Asset Security Platform (“CASP”) provides the advanced
technology and the architecture to secure crypto asset transactions. is provided with a web interface that can be used for the creation of accounts, users, and vaults, and managing quorum
Unbound’s Crypto Asset Security Platform (“CASP”) provides the advanced
technology and the architecture to secure crypto asset transactions. is provided with a web interface that can be used for the creation of accounts, users, and vaults, and managing quorum![]() One or more groups, comprised of participants operations.
One or more groups, comprised of participants operations.
The CASP![]() Unbound’s Crypto Asset Security Platform (“CASP”) provides the advanced
technology and the architecture to secure crypto asset transactions. Web UI is installed automatically with the CASP RPM Installation. If you need to install it manually, see Appendix B: Web Interface Manual Installation.
Unbound’s Crypto Asset Security Platform (“CASP”) provides the advanced
technology and the architecture to secure crypto asset transactions. Web UI is installed automatically with the CASP RPM Installation. If you need to install it manually, see Appendix B: Web Interface Manual Installation.
CASP Initialization
The first time that you open the CASP![]() Unbound’s Crypto Asset Security Platform (“CASP”) provides the advanced
technology and the architecture to secure crypto asset transactions. interface it guides you through creation of your initial account.
Unbound’s Crypto Asset Security Platform (“CASP”) provides the advanced
technology and the architecture to secure crypto asset transactions. interface it guides you through creation of your initial account.
Access the UI
Access the CASP![]() Unbound’s Crypto Asset Security Platform (“CASP”) provides the advanced
technology and the architecture to secure crypto asset transactions. web interface by navigating to:
Unbound’s Crypto Asset Security Platform (“CASP”) provides the advanced
technology and the architecture to secure crypto asset transactions. web interface by navigating to: https://<casp_ip>/caspui. The default username is so and the default password is casp.
An option is provided on the login screen to remember your login for the session. This feature allows the user to refresh the page without having to subsequently log in.
For information about setting up SSO![]() Single Sign-On access, see Single Sign-On.
Single Sign-On access, see Single Sign-On.
Create an Account
When you first access the CASP![]() Unbound’s Crypto Asset Security Platform (“CASP”) provides the advanced
technology and the architecture to secure crypto asset transactions. interface, you are presented with the following screen.
Unbound’s Crypto Asset Security Platform (“CASP”) provides the advanced
technology and the architecture to secure crypto asset transactions. interface, you are presented with the following screen.

Click the link and then enter the name of your account.

Note
An option is provided to make this a Global account![]() An account.. Participants from global accounts can be included in admin and approval groups for vaults from regular (non-global) accounts.
An account.. Participants from global accounts can be included in admin and approval groups for vaults from regular (non-global) accounts.
Create a Vault
Click Vaults to access the vaults screen.

You must create participants before you can create a vault. Click Participants from the menu to access that screen.
Add Participants
Add participants as described in Participants. Once all participants are activated, you can create Vaults.
Accounts
This screen provides information about your accounts, including the pending and total number of participants, vaults and operations.

Users
This screen lists all users for the account displayed at the top-right of the screen.

CASP![]() Unbound’s Crypto Asset Security Platform (“CASP”) provides the advanced
technology and the architecture to secure crypto asset transactions. has two types of users, called operators and participants. Use the Users screen to manage operators and use the Participants screen to manage participants. See CASP Operators and Participants for more information.
Unbound’s Crypto Asset Security Platform (“CASP”) provides the advanced
technology and the architecture to secure crypto asset transactions. has two types of users, called operators and participants. Use the Users screen to manage operators and use the Participants screen to manage participants. See CASP Operators and Participants for more information.
Clicking on Create opens a screen to create an operator. See CASP Roles for a description of the Roles column.
Creation of an Operator has two important options that can be enabled:
- Can participate in operation approval for account x - this operator can be included in admin and approval groups for the vault policy
 A set of conditions that define the MofN groups used for quorum-based transactions..
 - Use two-factor authentication ("2FATwo-factor authentication - Authentication method that requires both something a user has (for example, a certificate) and something the user knows (for example, a password)") - if enabled, when the operator attempts to log into the web interface, an authentication request is sent to that user's mobile device. The user is only permitted to access the web interface after 2FATwo-factor authentication - Authentication method that requires both something a user has (for example, a certificate) and something the user knows (for example, a password) approval on the mobile device.
A menu is provided at the end of each user row. Clicking the menu icon provides functions, such as generating a new activation code for a pending user, or replacing a phone for a participant![]() A member of any of the quorum groups.. A complete list of functions is shown in the following table.
A member of any of the quorum groups.. A complete list of functions is shown in the following table.
|
User Type |
Pending Status Functions |
Active Status Functions |
|---|---|---|
| Operator |
|
|
Participants
On the Participants screen, click Create. The following screen opens. See CASP Operators and Participants for more information about the different types of users in CASP![]() Unbound’s Crypto Asset Security Platform (“CASP”) provides the advanced
technology and the architecture to secure crypto asset transactions..
Unbound’s Crypto Asset Security Platform (“CASP”) provides the advanced
technology and the architecture to secure crypto asset transactions..

Enter the name and email and click Create participant![]() A member of any of the quorum groups.. There is a checkbox to define the participant
A member of any of the quorum groups.. There is a checkbox to define the participant![]() A member of any of the quorum groups. as an Offline Participants.
A member of any of the quorum groups. as an Offline Participants.
Note
Participants are added to the account shown in the top-right part of the screen, with the format <user>@<account>.
A menu is provided at the end of each user row. Clicking the menu icon provides functions, such as generating a new activation code for a pending participant![]() A member of any of the quorum groups., or replacing a phone for a participant
A member of any of the quorum groups., or replacing a phone for a participant![]() A member of any of the quorum groups.. A complete list of functions is shown in the following table.
A member of any of the quorum groups.. A complete list of functions is shown in the following table.
|
User Type |
Pending Status Functions |
Active Status Functions |
|---|---|---|
| Participant |
|
|
Participant![]() A member of any of the quorum groups. Activation
A member of any of the quorum groups. Activation
When you create a participant![]() A member of any of the quorum groups., a screen opens with the activation information for that participant
A member of any of the quorum groups., a screen opens with the activation information for that participant![]() A member of any of the quorum groups.. The participant
A member of any of the quorum groups.. The participant![]() A member of any of the quorum groups. can scan the QR code with the mobile app (The app has CASP
A member of any of the quorum groups. can scan the QR code with the mobile app (The app has CASP![]() Unbound’s Crypto Asset Security Platform (“CASP”) provides the advanced
technology and the architecture to secure crypto asset transactions. embedded in it that recognizes the QR code). Alternatively, you can send the participant
Unbound’s Crypto Asset Security Platform (“CASP”) provides the advanced
technology and the architecture to secure crypto asset transactions. embedded in it that recognizes the QR code). Alternatively, you can send the participant![]() A member of any of the quorum groups. the ID and activation code, or even a screenshot of the QR code.
A member of any of the quorum groups. the ID and activation code, or even a screenshot of the QR code.

Note
The participant![]() A member of any of the quorum groups. status remains Pending until activated. While pending activation, participants may not be added to a vault.
A member of any of the quorum groups. status remains Pending until activated. While pending activation, participants may not be added to a vault.
Repeat this process to add all the relevant participants. Once they are all activated, you can create Vaults.
Vaults
This screen lists all vaults associated with the account displayed at the top-right of the screen.

Click a row to see the details of the corresponding vault, including any assets contained in the vault and a list of the latest operations executed on the vault.
For example, the vault in the following image was just created. The Assets pane shows that it has multiple assets, but no funds. The Recent operations pane shows the join operations used when the vault was created.

From the main Vaults screen, click Create to create a new vault. Options are provided to create a Simple Vault or a Risk-Based Policy Vault.
Note
After creating a vault, the following cannot be changed:
- Add/remove policies
- Add/remove approval groups
- Enable/Disable offline status of a vault, policy, or group
Note
You can create vaults with the same name as long as one is a simple vault and one is a risk-based policy vault. You can change the name of the vault after it is created.
Simple Vault
Simple vaults provide a simple quorum![]() One or more groups, comprised of participants structure for approvals.
One or more groups, comprised of participants structure for approvals.

This screen has the following options:
- Name - enter the vault name.
- Wallet type- select the type of wallet.
- Description - (optional) description of the vault.
- Support sub-accounts (BIP44) - select if you want to have sub-accounts.
- Offline - select if you want this vault to be offline. Offline Vaults must have one approval group that has only Offline Participants.
- Approval groups - define your MofNDefines how many participants of a group are required for an approval. M out of N participants are sufficient to reach the quorum. structure from the available pool of participants.
Note
When there are multiple groups, the order of the groups determines when they are notified about approval requests. For example, group "A" gets notified, and then after enough approvals are received from group "A", group "B" is notified.
Tip
It is recommended that groups have more participants than the required minimum number for approval. This setup allows replacing a participant![]() A member of any of the quorum groups., which may be necessary if someone losses their phone or someone leaves the company.
A member of any of the quorum groups., which may be necessary if someone losses their phone or someone leaves the company.
Risk-Based Policy Vault
Risk-Based Policy vaults provide complex policy management, including flexible policy groups depending on transaction amounts and time of day. Creating a risk-based policy vault opens a wizard that guides you through the creation process.

Step 1: General info
This screen has the following options:
- Name - enter the vault name.
- Wallet type- select the type of wallet.
- Description - (optional) description of the vault.
- Support sub-account (BIP44) - select if you want to have sub-accounts.
- Offline - select if you want this vault to be offline. Offline Vaults must have one approval group that has only Offline Participants.
Step 2: Admin groups
This screen asks you to create administration groups for your vault. Any policy change requires approval from these admin groups.
Note
When there are multiple groups, the order of the groups determines when they are notified about approval requests. For example, group "A" gets notified, and then after enough approvals are received from group "A", group "B" is notified.
Tip
It is recommended that any quorum![]() One or more groups, comprised of participants group has more participants than the required minimum number for approval. This setup allows replacing a participant
One or more groups, comprised of participants group has more participants than the required minimum number for approval. This setup allows replacing a participant![]() A member of any of the quorum groups., which may be necessary if someone losses their phone or someone leaves the company.
A member of any of the quorum groups., which may be necessary if someone losses their phone or someone leaves the company.
Step 3: Attributes
Add attributes (see Templates) and Data Collectors to the vault.
Attributes provide a way to add static information to a vault that is sent with all signing requests. Attributes are first defined as a template (see Templates) and then assigned a value during this stage of vault creation.
Data collectors are defined on the Data Collectors screen and provide dynamic data that is sent with all signing requests.
Step 4: Policies
You can add approval and/or rejection policies. Each policy has a set of associated conditions that determine when the policy applies and which quorum![]() One or more groups, comprised of participants groups are used for it. Approval policies determine under which conditions a signing request is sent for approval to the quorum
One or more groups, comprised of participants groups are used for it. Approval policies determine under which conditions a signing request is sent for approval to the quorum![]() One or more groups, comprised of participants. Rejection policies define a set of conditions under which the signing request is rejected.
One or more groups, comprised of participants. Rejection policies define a set of conditions under which the signing request is rejected.
Each policy has these tabs:
- General - specify the name of the policy. It is recommended to use a descriptive name, such as "After hours approvals" or "High value transactions".
- Approval groups (only for approval policies) - add your relevant quorumOne or more groups, comprised of participants groups.
Note
When there are multiple groups, the order of the groups determines when they are notified about approval requests. For example, group "A" gets notified, and then after enough approvals are received from group "A", group "B" is notified. - Whitelist - create a static whitelist or a derived (dynamic) whitelist. See Whitelisting for more information.
- Asset limits - set minimum or maximum amount limits per asset type.
- Time limits - specify a time period and days of the week when the policy is valid.
For each withdrawal request, the first policy with matching rules from the enabled polices is used. You can drag and drop policies to reorder them.
Vault Backup
A vault can be backed up with this procedure:
- On the Vaults screen, click on the menu icon next to the vault name.
- Select More > Backup.
- If the vault has sub-accounts, it prompts you to select the account.
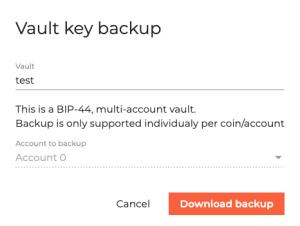
- Click Download backup.
- The backup is saved to the browser's downloads folder.

BIP32 and BIP44
The CASP![]() Unbound’s Crypto Asset Security Platform (“CASP”) provides the advanced
technology and the architecture to secure crypto asset transactions. implementation of hierarchical deterministic
Unbound’s Crypto Asset Security Platform (“CASP”) provides the advanced
technology and the architecture to secure crypto asset transactions. implementation of hierarchical deterministic![]() Calculation that each time results in the same value ("HD
Calculation that each time results in the same value ("HD![]() Hierarchical Deterministic - a type of deterministic Bitcoin wallet derived from a known seed, that allows for the creation of child keys from the parent key. Because the child key is generated from a known seed there is a relationship between the child and parent keys that is invisible to anyone without that seed.") wallets is based on the de-facto standards BIP32 and BIP44. This section provides some of the features of each of these standards to help you decide which one to use.
Hierarchical Deterministic - a type of deterministic Bitcoin wallet derived from a known seed, that allows for the creation of child keys from the parent key. Because the child key is generated from a known seed there is a relationship between the child and parent keys that is invisible to anyone without that seed.") wallets is based on the de-facto standards BIP32 and BIP44. This section provides some of the features of each of these standards to help you decide which one to use.
Hierarchical deterministic![]() Calculation that each time results in the same value wallets support multiple keypair chains that are derived from a single root. Each wallet has a hierarchy of keypair chains.
Calculation that each time results in the same value wallets support multiple keypair chains that are derived from a single root. Each wallet has a hierarchy of keypair chains.
- For BIP32 - the hierarchy is completely customizable.
- For BIP44 - the hierarchy uses a standard format and names. The hierarchy can be generated knowing only the seed.
BIP44 has the format: m / purpose' / coin_type' / account' / change / address_index
- m - master seed.
- purpose - Purpose is a constant set to 44' (or 0x8000002C) following the BIP43 recommendation. It indicates that the subtree of this node is used according to this specification.
- coin type - a constant, set for each cryptocoin.
- account - This level splits the key space into independent user identities, so the wallet never mixes the coins across different accounts.
- change - Constant 0 is used for external chain and constant 1 for internal chain (also known as change addresses). External chain is used for addresses that are meant to be visible outside of the wallet (e.g. for receiving payments). Internal chain is used for addresses which are not meant to be visible outside of the wallet and is used for return transaction change.
- address_index - Addresses are numbered from index 0 in sequentially increasing manner.
In general, BIP32 is used for Ethereum and BIP44 is used for Bitcoin.
Data Collectors
Data collectors are independent components that calculate policy related attribute templates for transaction signing. Each data collector is associated with an attribute template group that contains the attribute templates.

Unlike participants, which can be human and require no development, data collectors by definition require development by the customer![]() The entity that initially holds the crypto asset and requests storage in the crypto asset vault.. See the CASP Java SDK in the CORE Developers Guide for more information on creating the data collector client.
The entity that initially holds the crypto asset and requests storage in the crypto asset vault.. See the CASP Java SDK in the CORE Developers Guide for more information on creating the data collector client.
To create a data collector:
-
Select the Data Collectors screen from the left menu.
-
Click Add data collector.
-
Enter a name and description, and then select the relevant attribute template group.
-
Click Create.
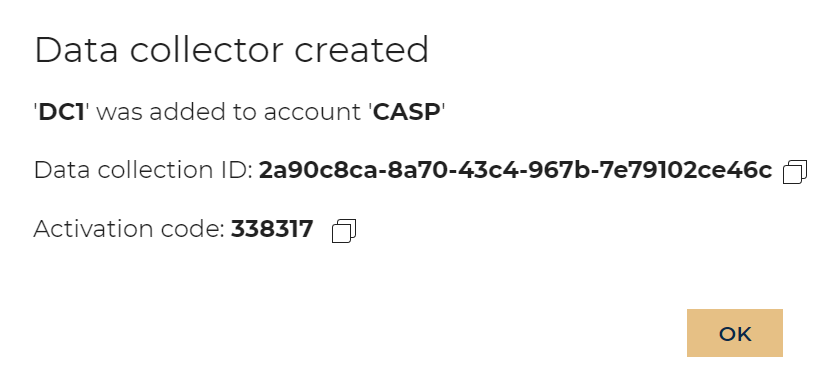
A screen appears with the details of the data collector.
-
Use the data collection ID and activation code to set up the client that handles data collection. See the CORE Developers Guide for more information on creating the data collector client.
Templates
This screen enables creation of both attribute templates and attribute template groups.

Attribute templates enable you to add custom static attributes to a CASP![]() Unbound’s Crypto Asset Security Platform (“CASP”) provides the advanced
technology and the architecture to secure crypto asset transactions. vault during vault creation. Attributes consist of one or more of the following types: string, numeric, date and Boolean. To ensure security, the attributes are approved by the admin group during vault creation. A customer
Unbound’s Crypto Asset Security Platform (“CASP”) provides the advanced
technology and the architecture to secure crypto asset transactions. vault during vault creation. Attributes consist of one or more of the following types: string, numeric, date and Boolean. To ensure security, the attributes are approved by the admin group during vault creation. A customer![]() The entity that initially holds the crypto asset and requests storage in the crypto asset vault. can use these attributes to add logic to a policy. For example, a transaction that is initiated during a predefined date range will go through a certain MofN
The entity that initially holds the crypto asset and requests storage in the crypto asset vault. can use these attributes to add logic to a policy. For example, a transaction that is initiated during a predefined date range will go through a certain MofN![]() Defines how many participants of a group are required for an approval. M out of N participants are sufficient to reach the quorum. approval policy.
Defines how many participants of a group are required for an approval. M out of N participants are sufficient to reach the quorum. approval policy.
Use this screen to create attribute templates along with their associated limits. For example, create a numerical attribute with a minimum of 2 and a maximum of 1000.
Attribute templates can be grouped together into attribute template groups. These groups are needed for the data collectors.
After creating attribute templates, you can create a Risk-Based Policy Vault and assign a value to the attributes. During the vault creation flow, there is a screen that allows you to add the attributes and assign values to them.
Operations
This screen lists all approval quorum![]() One or more groups, comprised of participants operations for the current account.
One or more groups, comprised of participants operations for the current account.

Clicking on the menu next to an operation and selecting Show info opens a screen with details about the operation, such as the following for a sign operation:

Transaction fee calculation
Bitcoin
For bitcoin, fees are calculated using network fee estimates per KB, based on averages from the blockchain.
For example:
"high_fee_per_kb": 25555,
"medium_fee_per_kb": 25000,
"low_fee_per_kb": 15000,
When the user selects the fee preference, HIGH, MEDIUM or LOW, the matching x_fee_per_kb is multiplied by the transaction size in KB to get the actual fee.
Note
The fee is not configurable for Bitcoin.
Ethereum
Ethereum transaction fees are calculated by gas units multiplied by price per unit. When sending a transaction, senders can decide the limit of gas units that they are willing to pay and what price per unit they are willing to pay.
The actual fee is {number of gas units used} * {price per unit}. The number of units that was used might be lower then the limit set by the sender.
To use HIGH, MEDIUM, and LOW fee preferences, the user must configure a set of multipliers in the production.yaml file.
For example:
gasPriceFeeMultipliers: {
MEDIUM: 1,
LOW: 0.8,
HIGH: 1.5
}
When sending a transaction, the relevant multiplier is selected and applied on the average network gas price. The multiplier constant must be configured, otherwise the fee calculation fails and the transaction fails on build.
Reports
CASP![]() Unbound’s Crypto Asset Security Platform (“CASP”) provides the advanced
technology and the architecture to secure crypto asset transactions. empowers custodians to adhere to governance, risk management and compliance (GRC) guidelines by providing operations users a simple way to export data in CSV
Unbound’s Crypto Asset Security Platform (“CASP”) provides the advanced
technology and the architecture to secure crypto asset transactions. empowers custodians to adhere to governance, risk management and compliance (GRC) guidelines by providing operations users a simple way to export data in CSV![]() Comma Separated Values format from the user interface. The Reports screen provides viewing, filtering, and downloading reports for Vaults, Users, Accounts, Operations and Audit.
Comma Separated Values format from the user interface. The Reports screen provides viewing, filtering, and downloading reports for Vaults, Users, Accounts, Operations and Audit.
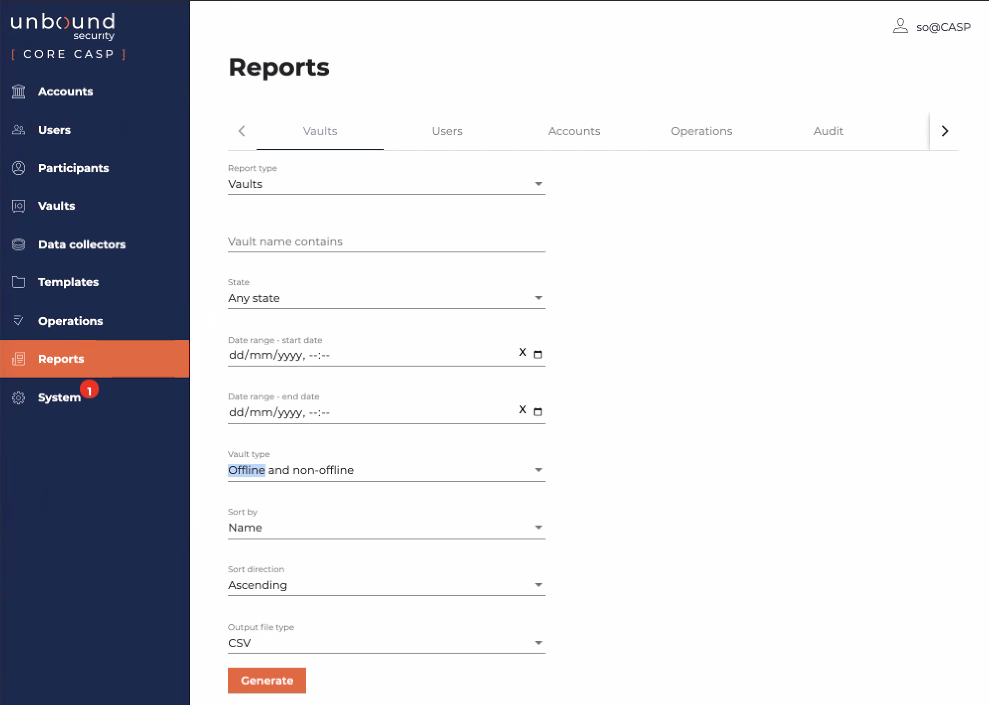
For example:
- From the Operations tab - a user (such as an accountant) can view, filter, and then download transaction data, which can be shared with the end customers, regulators, with a 3rd party trustee, etc.
- From the Users tab - a user can view, filter and then download the list of users and their activation status.
- From the Vaults tab - a user (such as a CISO or a supervisor) can view, filter and then download data of the various vaults that are in CASPUnbound’s Crypto Asset Security Platform (“CASP”) provides the advanced
technology and the architecture to secure crypto asset transactions.. This data is most important for custodians that manage thousands of vaults of different customers. A user can share the exported data with any party, such as the end customers, regulators, etc.
Notes
1. Times in output reports are in UTC.
2. If a time value is unknown, it is displayed as 1/1/1970 0:00.
3. If your report contains non-English characters and you are trying to open the CSV![]() Comma Separated Values file in Microsoft Excel, you may need to use the import data wizard to import the data with the correct character encoding.
Comma Separated Values file in Microsoft Excel, you may need to use the import data wizard to import the data with the correct character encoding.
System
This screen provides information about CASP![]() Unbound’s Crypto Asset Security Platform (“CASP”) provides the advanced
technology and the architecture to secure crypto asset transactions. health, Wallet health, and Trusted systems.
Unbound’s Crypto Asset Security Platform (“CASP”) provides the advanced
technology and the architecture to secure crypto asset transactions. health, Wallet health, and Trusted systems.

The screen has sections for:
- Alerts - if there are any issues that may prevent the CASPUnbound’s Crypto Asset Security Platform (“CASP”) provides the advanced
technology and the architecture to secure crypto asset transactions. system from operating properly, they appear at the top. For example, in the previous image the Firebase and Ethereum tokens were not specified.
- CASPUnbound’s Crypto Asset Security Platform (“CASP”) provides the advanced
technology and the architecture to secure crypto asset transactions. health - shows status information about the components in the CASPUnbound’s Crypto Asset Security Platform (“CASP”) provides the advanced
technology and the architecture to secure crypto asset transactions. system.
- Wallet health - shows the status of the Built-in Wallets.
- Trusted systems - shows information about the trusted systems and enables adding and removing these systems. See Trusted Systems for more information.
There is a button, called Generate API Key, that generates a new API key.
Note
When creating an API key, you must define a user and the user's role. Information about roles can be found in CASP Roles.
After entering the key details, the resulting screen provides a copy button to copy the API key to the clipboard.

Participant Management
The following sections detail procedures for common operations needed when managing participants.
-
Participant leaves the company or a specific vault (suspend)
- Participant leaves the company or a specific vault (revoke)
- BOT becomes unavailable
- Replace a Participant
Create a participant
A participant![]() A member of any of the quorum groups. is created in a specific account. On the Participants screen, click Create.
A member of any of the quorum groups. is created in a specific account. On the Participants screen, click Create.
Update participant details
You can update a participant![]() A member of any of the quorum groups.'s details, including the name and email address, by clicking the menu icon in the Participants screen.
A member of any of the quorum groups.'s details, including the name and email address, by clicking the menu icon in the Participants screen.
You can also use this endpoint to globally set the participant![]() A member of any of the quorum groups. status to SUSPENDED or REVOKED. A suspended or revoked participant
A member of any of the quorum groups. status to SUSPENDED or REVOKED. A suspended or revoked participant![]() A member of any of the quorum groups. cannot perform any action on any operation, such as approving a sign request.
A member of any of the quorum groups. cannot perform any action on any operation, such as approving a sign request.
Create a vault with existing participants
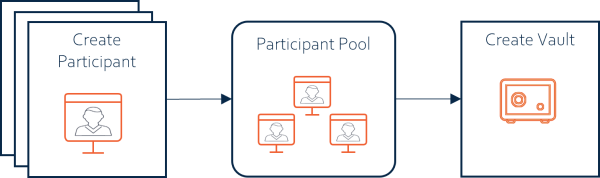
- Step 1: Create participants. You need enough activated participants to implement the quorumOne or more groups, comprised of participants groups for your vault.
- Step 2: Create a vault on the Vaults screen. During vault creation, you assign participants to be members of the relevant quorumOne or more groups, comprised of participants groups.
- Step 3: Each quorumOne or more groups, comprised of participants group member needs to approve joining the vault.
Add a participant to an existing vault

- Step 1: Create and activate a new participantA member of any of the quorum groups. (ParticipantA member of any of the quorum groups. B) if the participantA member of any of the quorum groups. does not exist.
- Step 2: Add this participantA member of any of the quorum groups. to one of the quorumOne or more groups, comprised of participants groups in the vault on the Vaults screen.
- Step 3: The required quorumOne or more groups, comprised of participants group members must approve this operation.
-
Step 4: The participant
A member of any of the quorum groups. must approve being added to the vault.
Participant put on hold globally or in a specific vault (suspend)
A participant![]() A member of any of the quorum groups. may need to be suspended in different situations. For example:
A member of any of the quorum groups. may need to be suspended in different situations. For example:
- Regulatory hold - for some regulatory reason, the participantA member of any of the quorum groups. needs to be prevented from performing any actions.
To suspend a participant![]() A member of any of the quorum groups.:
A member of any of the quorum groups.:
- On the Participants screen, click the options button next to the participantA member of any of the quorum groups..
- Select Suspend.

Upon successful suspension, the participant![]() A member of any of the quorum groups. Status changes from Active to Suspended.
A member of any of the quorum groups. Status changes from Active to Suspended.
This participant![]() A member of any of the quorum groups. can be activated in the Participants screen by selecting the menu icon and then Resume.
A member of any of the quorum groups. can be activated in the Participants screen by selecting the menu icon and then Resume.

Note
You receive a warning if suspending a participant![]() A member of any of the quorum groups. violates the quorum
A member of any of the quorum groups. violates the quorum![]() One or more groups, comprised of participants policy. For example, if the quorum
One or more groups, comprised of participants policy. For example, if the quorum![]() One or more groups, comprised of participants requires 2 participants for approval, and there are only 2 participants, and you suspend one of them. The best practice is to first add a new participant
One or more groups, comprised of participants requires 2 participants for approval, and there are only 2 participants, and you suspend one of them. The best practice is to first add a new participant![]() A member of any of the quorum groups. (for a total of 3) and then one can be suspended.
A member of any of the quorum groups. (for a total of 3) and then one can be suspended.
Participant leaves the company or a specific vault (revoke)
A participant![]() A member of any of the quorum groups. may need to be revoked in several situations, such as:
A member of any of the quorum groups. may need to be revoked in several situations, such as:
- Functional job change - the participantA member of any of the quorum groups. changes to a new position and should no longer be a member of the quorumOne or more groups, comprised of participants.
- Employee leaves - the employee leaves the company.
To revoke a participant![]() A member of any of the quorum groups.:
A member of any of the quorum groups.:
- On the Participnts screen, click the options button next to the participantA member of any of the quorum groups..
- Select Revoke.

Upon revoking successfully, the participant![]() A member of any of the quorum groups. Status changes from Active to Revoked.
A member of any of the quorum groups. Status changes from Active to Revoked.

Note
You cannot revoke a participant![]() A member of any of the quorum groups. if it violates the quorum
A member of any of the quorum groups. if it violates the quorum![]() One or more groups, comprised of participants policy. For example, if the quorum
One or more groups, comprised of participants policy. For example, if the quorum![]() One or more groups, comprised of participants requires 2 participants for approval, and there are only 2 participants, you cannot remove either one. First, add a new participant
One or more groups, comprised of participants requires 2 participants for approval, and there are only 2 participants, you cannot remove either one. First, add a new participant![]() A member of any of the quorum groups. (for a total of 3) and then one can be removed.
A member of any of the quorum groups. (for a total of 3) and then one can be removed.
Participant replaces a phone (reactivate)
If one of your participants replaces their phone with a new one (such as after losing a phone), use the following procedure:
- On the Participants screen, click the options button next to the participantA member of any of the quorum groups..
- Select Replace phone.
- A screen appears that shows a list of all the vaults that the participantA member of any of the quorum groups. is a part of. Select the vaults that you want to reactivate the user in. The default is all vaults.
- A new activation code appears.

Note
Participants cannot approve/deny operations until they are approved to be re-added to the relevant vaults.
Note
When a participant![]() A member of any of the quorum groups. is activated, a unique key share
A member of any of the quorum groups. is activated, a unique key share![]() A random string that in combination with the other key-shares reassembles the key. is created by the app. If this key share
A random string that in combination with the other key-shares reassembles the key. is created by the app. If this key share![]() A random string that in combination with the other key-shares reassembles the key. is in any way removed, the participant
A random string that in combination with the other key-shares reassembles the key. is in any way removed, the participant![]() A member of any of the quorum groups. needs to be reactivated (to create a new key share
A member of any of the quorum groups. needs to be reactivated (to create a new key share![]() A random string that in combination with the other key-shares reassembles the key.) and then re-added to any vaults. Key share
A random string that in combination with the other key-shares reassembles the key.) and then re-added to any vaults. Key share![]() A random string that in combination with the other key-shares reassembles the key. loss is a result of any of these actions:
A random string that in combination with the other key-shares reassembles the key. loss is a result of any of these actions:
- The app is removed from the device.
- The user resets the app data.
- The user gets a new phone.
Note
If a participant![]() A member of any of the quorum groups. is added to a vault and the reactivate command is executed before the participant
A member of any of the quorum groups. is added to a vault and the reactivate command is executed before the participant![]() A member of any of the quorum groups. approves joining the vault, the command returns an error. The operation to add the participant
A member of any of the quorum groups. approves joining the vault, the command returns an error. The operation to add the participant![]() A member of any of the quorum groups. must first be canceled and then the reactivate can be resubmitted.
A member of any of the quorum groups. must first be canceled and then the reactivate can be resubmitted.
BOT becomes unavailable
If one of your BOT's data is lost or otherwise unavailable, you can replace it with these steps:
- Step 1: Deactivate the BOT using Suspend or Revoke.
- Step 2: Run the steps in Add a participant to an existing vault to activate the new BOT in all of the relevant vaults.
Replace a Participant
If you want to replace one of the participants, use the following procedure.
Warning
Your quorum![]() One or more groups, comprised of participants groups should have more participants than the required minimum number for approval. This setup allows replacing a participant
One or more groups, comprised of participants groups should have more participants than the required minimum number for approval. This setup allows replacing a participant![]() A member of any of the quorum groups., which may be necessary if someone losses their phone or someone leaves the company.
A member of any of the quorum groups., which may be necessary if someone losses their phone or someone leaves the company.
- If the participantA member of any of the quorum groups. that you want to add does not yet exist in CASPUnbound’s Crypto Asset Security Platform (“CASP”) provides the advanced
technology and the architecture to secure crypto asset transactions., then add a new participantA member of any of the quorum groups..
- On the Participants screen, click Create.
- Fill in the details and then click Create participantA member of any of the quorum groups..
- Add the participantA member of any of the quorum groups. to the vault.
- On the Vaults screen, click the vault name.
A screen opens showing the vault details. - Click the Admin groups tab.
- Select Add a member from the bottom-right corner of the pane.
- Fill in the details and then click Add member.
- Suspend (or revoke) the participantA member of any of the quorum groups. that is being replaced with the instructions in Participant put on hold globally or in a specific vault (suspend).
Wait for the participant![]() A member of any of the quorum groups. to become activated.
A member of any of the quorum groups. to become activated.
The quorum![]() One or more groups, comprised of participants needs to approve adding a new member.
One or more groups, comprised of participants needs to approve adding a new member.