Client Installation
CORE client software installation steps:
- Prerequisites:
- Validate CORE Client Requirements.
- On the Linux platforms - the OS-specific software package manager is prepared to validate the integrity and authenticity of the CORE software distribution. See Validating Debian and RPM Packages.
- If Integrating with Oracle TDE - install the
libgnutls28. See use_gnuTLS Setting .
- Install using one of the following options:
- Automatic client configuration - use the following sequence of steps:
- Manual client configuration- use the following sequence of steps:
Note
To finalize the client's deployment, register it with the relevant CORE partitions. See example in Client Activation Quickstart.
Install CORE Client
- Install:
-
 RHEL, Centos use
 yumorrpm:sudo rpm -ivh ekm-client-<version>.<el7+el8>.x86_64.rpm
-
Fedora, use either
dnforrpm:sudo rpm -ivh ekm-client-<version>.<el7+el8>.x86_64.rpm
-
Suse:
sudo zypper install ekm-client-<VERSION>.SuSE.x86_64.rpm
-
Ubuntu:
sudo dpkg -i ekm-client-<version>.<deb8+deb9+deb10>_amd64.deb
-
AIX on POWER® CPU:
- Unzip and untar the obtained tar.gz file to the designated directory:
- Add the
<CORE client target directory>to theLD_LIBRARY_PATH.
gunzip ekm_client-<VERSION>.aix7.1.tar.gz
tar -vxf ekm_client-<VERSION>.aix7.1.tar -C <CORE client target directory> -
MacOS:
You will need
root,sudo, orpoweruser privileges.- To install, click on the obtained
ekm-client-<VERSION>.pkgfile. It is mandatory to specify the default installation folder. - Reboot the system.
The installation creates
ubVirtualTokenHost.appin the/Applicationsfolder while asserting the signatures and notarization. - To install, click on the obtained
-
Windows:
ekm-client-<VERSION>.windows.x64.msi
The default installation folder is
C:\Program Files\Dyadic\EKM.Enterprise Key Management - previous name of the product.Tip
To install CORE using non-interactivemsiexec.exeoption "/qn":
(msiexec.exe ekm-client-<VERSION>.windows.x64.msi /qn)
This option requires Windows Elevated Privileges, such as provided by the Windows Powershell (Admin). For other methods to run the non-interactive installation with the elevated privilege, check Elevated Privileges Windows. - Run the
ucl versioncommand for a quick sanity check. - Continue to Set the Mandatory Settings.
Set the Mandatory Settings
It is mandatory to customize the servers setting, while the rest of the settings are set to their default values.
Note
The servers setting is a comma-separated list of EP servers URLs:
<EP1>[:<TCP/IP port>] [,<EP2>[:<TCP/IP port>]] [,<EP3>[:<TCP/IP port>]]
The default port is 443. For additional info, see Servers Setting .
You have two options to customize the installed client's setting: automatic and manual.
Automatic Configuration
During CORE client software initial deployment or upgrade, the client settings may be automatically modified as specified in the install_props.txt file.
- Prerequisites:
- Entries in the file use the
name=valueformat. - The only mandatory entry in the file is the servers= setting. For example,
servers=ep1.
The install_props.txt file must be located in the same directory as the installation software.
Tip
You may use this file to customize any setting listed in the Client Installation. For exampleservers=ep1,ep2
check-integrity=-1
app_arg_full = java|openssl
Manual Configuration
-
Linux and MacOS:
Edit the Client Configuration file (e.g., for Linux, the conf file is located in either of these locations: in older versions:
/etc/ekm/client.confor in newer versions/etc/unbound/client.conf):Replace the
ChangeToCOREHostnameOrIP:443with the FQDNFully-qualified domain name - The complete domain name for a specific computer or host., DNS, or IP address of the EP server followed by the required port unless it is the default (443) port.
For example:servers=ep1.eastus.cloudapp.azure.com
-
Windows:
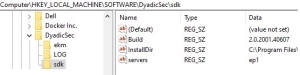
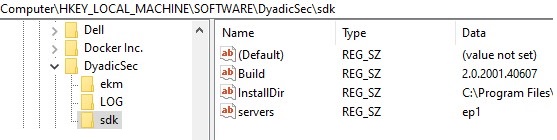
- Edit the Client Configuration registry.
- Replace the default EP server specification in the
serversfield (ChangeToCOREHostnameOrIP) with the FQDNFully-qualified domain name - The complete domain name for a specific computer or host., DNS or IP address of the EP server followed by the required port unless it is the default (443) port.
For example:
Test the Settings
Run the ucl diagnose command. Since we have not yet registered with any CORE partition, the expected response is:
Error (ucl): No partition found
Any other response indicates an error in the servers setting.
CORE Client Activation
Accessing a key material using the CORE client requires possession of the corresponding partition's certificate. Such a certificate may be:
- issued by CORE CA or by the tenant's CA.
- persistent or ephemeral.
- issued for the particular CORE client appliance or a group of appliances.
These options are further specified in Client Types and Certificates. In the following example, we use the registration method to obtain a persistent certificate issued by the CORE CA for client by name "my-pc".
Client Activation Quickstart
The following example shows how to obtain a certificate for partition "test" that was created in Quickstart on Linux. We assume the following:
- The address of the EP server (ep1) is configured in the client's
serverssetting. - The credentials of "test" partition SOSecurity officer - UKC partition administrator role. are (so, Password2!).
- The partition's certificate is issued by CORE CA to client "my-pc".
| Step | Run-on | Command |
|---|---|---|
| 1 | EP |
Create an activation code that allows "my-pc" obtain the "test" partition's certificate: ucl client create \ Note: The output of this command is an activation code. It is valid for a few minutes as defined in the partition's settings. |
| 2 |
Appliance "my-pc" |
Use the activation code to complete the registration, obtain and install the required certificate: ucl register -p test -n my-pc --code <activation code> |
| 3 |
Check the system's readiness to handle your requests. ucl diagnose -p test Note: This step is optional. Use it for your information or to collect the troubleshooting info. |
|
| 4 |
Create and display an RSA key: ucl generate -t rsa --name my-rsa1 |
Troubleshooting the Server's Certificate
CORE client addresses an EP by its hostname, FQDN![]() Fully-qualified domain name - The complete domain name for a specific computer or host.-name, or IP address as stored in its
Fully-qualified domain name - The complete domain name for a specific computer or host.-name, or IP address as stored in its servers setting. During the SSL![]() Secure Sockets Layer - a cryptographic protocol that provides communications security over a computer network. handshake, the CORE server provides its certificate where the server is identified by the following:
Secure Sockets Layer - a cryptographic protocol that provides communications security over a computer network. handshake, the CORE server provides its certificate where the server is identified by the following:
- IP address.
- The name is specified during its bootstrap ( the
--selfparameter). - Any other names in the certificate's SANSubject Alternative Names - Certificate field with a list of IP addresses. field.
The client validates that one of these entries is equal to the entry it had selected from its servers setting. A mismatch results in an error that may be fixed by either changing the servers setting or updating the SAN![]() Subject Alternative Names - Certificate field with a list of IP addresses. list in the certificate. To update the SAN
Subject Alternative Names - Certificate field with a list of IP addresses. list in the certificate. To update the SAN![]() Subject Alternative Names - Certificate field with a list of IP addresses. list, use the ekm_renew_server_certificate script.
Subject Alternative Names - Certificate field with a list of IP addresses. list, use the ekm_renew_server_certificate script.