Cloud Keystores
CORE partition SO![]() Security officer - UKC partition administrator role. may expand the partition's boundaries by attaching to it cloud keystores and on-premises HSMs. The partition users and can generate and use key material in the attached keystores. This type of integration is specified in CORE partition and key management guides. See
Security officer - UKC partition administrator role. may expand the partition's boundaries by attaching to it cloud keystores and on-premises HSMs. The partition users and can generate and use key material in the attached keystores. This type of integration is specified in CORE partition and key management guides. See
This section addresses the opposite case where CORE serves as an expansion of a cloud keystore.
Google Cloud EKM
Unbound provides support for the Google Cloud External Key Manager (Cloud EKM![]() Enterprise Key Management - previous name of the product.) via integration with Unbound CORE. The CORE key management platform offers Google customers a way to centrally manage and control the encryption keys protecting all of their data stored on Google Cloud. The solution decrypts the data encryption keys necessary for any query on-the-fly while maintaining a tamper-proof audit.
Enterprise Key Management - previous name of the product.) via integration with Unbound CORE. The CORE key management platform offers Google customers a way to centrally manage and control the encryption keys protecting all of their data stored on Google Cloud. The solution decrypts the data encryption keys necessary for any query on-the-fly while maintaining a tamper-proof audit.
The Unbound CORE External Key Manager for Google Cloud (“CORE-EKM![]() Enterprise Key Management - previous name of the product.”) enables businesses worldwide to protect and be in full control of their data on Google Cloud. Data stored and used by Google Cloud, including services such as BigQuery, Cloud SQL, Kubernetes Engine and Compute Engine Persistent Disks can now be encrypted at-rest using Unbound keys that are fully controlled and owned by the customer. Google Cloud does not have control to these encryption keys; they are protected and managed solely by the enterprise customer using Unbound CORE.
Enterprise Key Management - previous name of the product.”) enables businesses worldwide to protect and be in full control of their data on Google Cloud. Data stored and used by Google Cloud, including services such as BigQuery, Cloud SQL, Kubernetes Engine and Compute Engine Persistent Disks can now be encrypted at-rest using Unbound keys that are fully controlled and owned by the customer. Google Cloud does not have control to these encryption keys; they are protected and managed solely by the enterprise customer using Unbound CORE.
Unbound CORE External Key Manager for Google Cloud uses a virtual Hardware Security Module (vHSM) to deploy the solution in the cloud, as close as possible to protected data in the cloud. The solution also scales to match the needs of the business. There is no need for unique hardware deployment; this is a cloud-era solution – secure, performant and easy to use.
How to use this Integration
Note
Unbound CORE was previously called UKC. It may still be referred to as UKC in some of the documents.
The CORE-EKM![]() Enterprise Key Management - previous name of the product. component sits in between Google Cloud Platform and the external CORE key manager. Setting up CORE to protect Google Cloud Platform has the following steps:
Enterprise Key Management - previous name of the product. component sits in between Google Cloud Platform and the external CORE key manager. Setting up CORE to protect Google Cloud Platform has the following steps:
-
Set up CORE. Use the instructions found in the CORE Installation Guide.
-
Implement CORE-EKM
 Enterprise Key Management - previous name of the product. – see CORE-EKM Setup.
 -
Configure Cloud EKM
Enterprise Key Management - previous name of the product. access – see Setup CORE for Cloud EKM.
A sample setup for CORE in a way most suited for this use case is described in Golden Environment Architecture.
The environment can be tested with the instructions found in Using GCP services protected by CORE.
CORE-EKM Setup
CORE-EKM![]() Enterprise Key Management - previous name of the product. is set up as an image running in Google’s Cloud Run service.
Enterprise Key Management - previous name of the product. is set up as an image running in Google’s Cloud Run service.
To set up CORE-EKM![]() Enterprise Key Management - previous name of the product.:
Enterprise Key Management - previous name of the product.:
-
From the Google Cloud Platform console, open Cloud Run.
-
Click CREATE SERVICE.
The create service window appears.
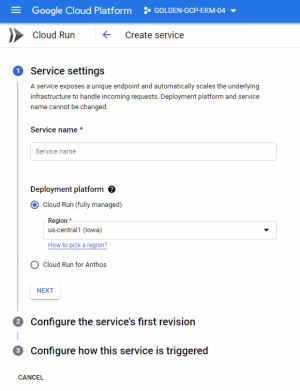
You need to configure the service in the three sections as described in the following sections.
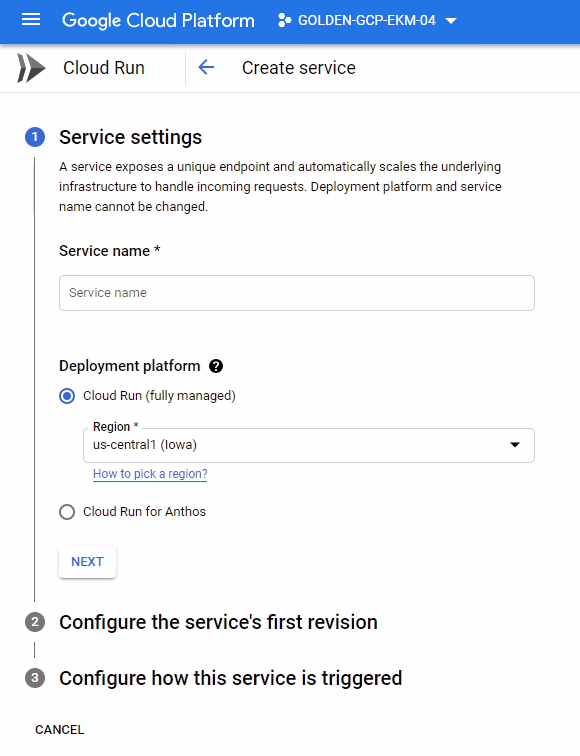
Service settings
-
Give the service a name.
-
Under Cloud Run, choose the region (such as us-central1).
-
Click NEXT.
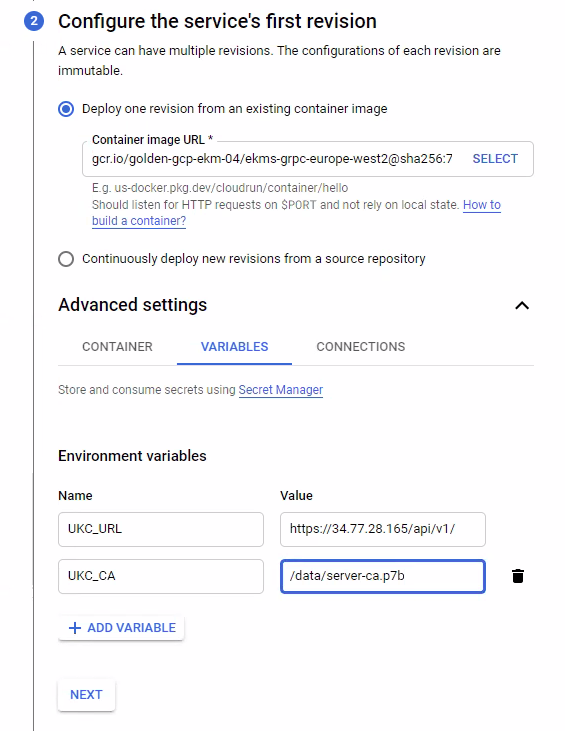
Configure the service’s first revision
Step 1: Upload an image to GCP
-
Obtain the certificate that will be used for the CORE servers (see here). In the examples, this file is called server-ca.p7b. You can run the following command to get the certificate:
ucl root_ca --output server-ca.p7b
-
Run Cloud Shell from Cloud Run.
-
Upload the server-ca.p7b file to the Cloud Shell.
-
Create a file called Dockerfile with the following contents.
FROM unboundukc/ub-grpc
COPY ./server-ca.p7b /data/server-ca.p7b -
From the directory containing Dockerfile, run the following command, where PROJECT-NAME is the name of the project in Google Cloud, and FILENAME is any name for the file.
gcloud builds submit --tag gcr.io/<PROJECT-NAME>/<FILENAME>
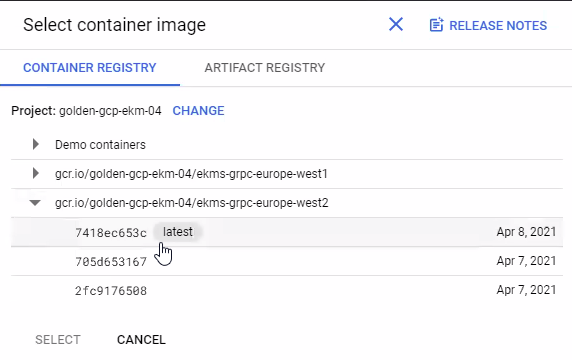
Step 2: Select the image from Cloud Run
-
Click Select in Deploy one revision from an existing container image.
-
The available images for the CORE-EKM
Enterprise Key Management - previous name of the product. appear on the right side. The name of the image comes from the tag given in the previous section:gcr.io/<PROJECT-NAME>/<FILENAME>

-
Click the image and then SELECT.
-
Click on Advanced settings.
-
On the Container tab:
-
In the Capacity section, select the memory and CPUs appropriate for your project.
-
In the Autoscaling section, leave the minimum and maximum number of instances as the default values. If needed, you can increase the number of instances to achieve a higher throughput.
-
On the Variables tab:
-
Add variables for the following:
-
-
UKC_URL – the URL used to access the CORE key management API.
-
UKC_CA – the location of the certificate authority file. This path is set in Step 1: Upload an image to GCP.
-
Click NEXT.
For example, see the values set in the following figure:
Configure how this service is triggered
-
Under Ingress, select Allow internal traffic and traffic from Cloud Load Balancing.
-
Click CREATE.
The CORE-EKM![]() Enterprise Key Management - previous name of the product. service is now created.
Enterprise Key Management - previous name of the product. service is now created.
At this point you can determine the URL used to identify keys through CORE-EKM![]() Enterprise Key Management - previous name of the product..
Enterprise Key Management - previous name of the product..
-
If you are accessing the CORE-EKM
Enterprise Key Management - previous name of the product. directly: Locate the name in the Google Cloud Run console. -
If you are using a load balancer (such as described in the Golden Environment Architecture): Either access the details in the Google console or run the following command:
gcloud compute addresses describe <LOAD-BALANCER-NAME> --format="get(address)" –global
This URL is needed for Using GCP services protected by CORE.
Setup CORE for Cloud EKM
To setup CORE with Google Cloud EKM![]() Enterprise Key Management - previous name of the product., first grant access to CORE and then create a key in CORE, as explained in the following sections.
Enterprise Key Management - previous name of the product., first grant access to CORE and then create a key in CORE, as explained in the following sections.
Configure CORE access
Authorize the Google Cloud EKM![]() Enterprise Key Management - previous name of the product. to access CORE. This process involves adding Google as an OpenID provider to CORE and then setting up the relevant user. See the CORE User Guide section on Single Sign-on for details on adding an OpenID provider.
Enterprise Key Management - previous name of the product. to access CORE. This process involves adding Google as an OpenID provider to CORE and then setting up the relevant user. See the CORE User Guide section on Single Sign-on for details on adding an OpenID provider.
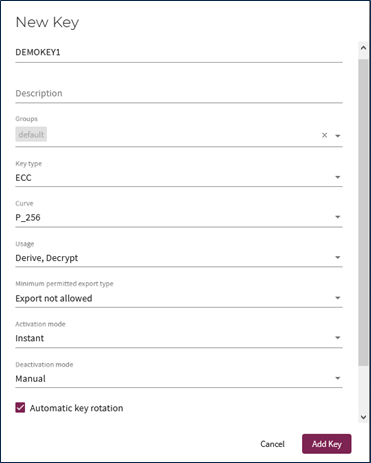
Create key
Test that the setup is working with wrap and unwrap functions provided by a CORE key.
In the CORE interface, on the Keys and Certificates screen, create an ECDH![]() Diffie–Hellman (ECDH) is a key agreement protocol used to establish shared secret by deriving it from EC keys. key as specified below This key is the external KEK
Diffie–Hellman (ECDH) is a key agreement protocol used to establish shared secret by deriving it from EC keys. key as specified below This key is the external KEK![]() Key Encryption Key - Used to encrypt the data encryption key (DEK)., where the private key stays in CORE and the public key is used to wrap the Google KEK
Key Encryption Key - Used to encrypt the data encryption key (DEK)., where the private key stays in CORE and the public key is used to wrap the Google KEK![]() Key Encryption Key - Used to encrypt the data encryption key (DEK)..
Key Encryption Key - Used to encrypt the data encryption key (DEK)..
Testing the CORE setup from the CLI
-
In the GCP console, create a private key for the service account.
-
Under Service account details, click ADD KEY.
-
Set the Key type must be set to JSON.
-
Click CREATE. A file is downloaded.
-
Set the following environment variable using this file name as the argument.
export GOOGLE_APPLICATION_CREDENTIALS=<FILENAME>.json
-
-
We will need a token to authorize access to the CORE. Download the get_google_token.py token creation script from Unbound’s repository found here.
You may need to install the API Python client for this script to run.
pip install --upgrade google-api-python-client
-
Get the external KMS
Key Management System token.-
Run:
EKMS_TOKEN=`python get_google_token.py localhost`
-
Check that the token works. For example:
curl https://ekms-unbound.unboundtech.com/v0/info?partition=ekms-partition-01 -H "Authorization: Bearer ${EKMS_TOKEN}"
-
On success you receive a response similar to:
{"version":"2.0.2010.38364"}
-
-
Run the curl wrap command to wrap the following plaintext in the Base64 format.
curl 'https://<LOAD-BALANCER-URL>/v0/<PARTITION-NAME>.<KEYNAME>:wrap' -H "Authorization: Bearer $EKMS_TOKEN" -d '{"plaintext": "MDEwMjAzMDQwNTA2MDcwODAxMDIwMzA0MDUwNjA3MDgwMTAyMDMwNDA1MDYwNzA4MDEwMjAzMDQwNTA2MDcwOA==", "additional_authenticated_data": "MTIzNA=="}'
Sample expected output:
{
"wrapped_blob": "AALQ5+qUmqhzb4gS3IA1NKsaTjyWfgFA5McPDLAnAp31CViR4mQ0ZsqrOS+kxNRDXcJbMQhPh5r6iao6cDF7Zho4VugwDsUEH6UzNmVd+c3aiIQ6aYz3JhkQsqY1/CTkecDeNhwChJZv6p3XQfzKw5QuL7V++/xD56g="
} -
Run the curl unwrap command.
curl 'https://<LOAD-BALANCER-URL>/v0/<PARTITION-NAME>.<KEYNAME>:unwrap' -H "Authorization: Bearer $EKMS_TOKEN" -d '{"wrapped_blob": " AALQ5+qUmqhzb4gS3IA1NKsaTjyWfgFA5McPDLAnAp31CViR4mQ0ZsqrOS+kxNRDXcJbMQhPh5r6iao6cDF7Zho4VugwDsUEH6UzNmVd+c3aiIQ6aYz3JhkQsqY1/CTkecDeNhwChJZv6p3XQfzKw5QuL7V++/xD56g=", "additional_authenticated_data": "MTIzNA=="}'
Sample expected output:
{
"plaintext": "MDEwMjAzMDQwNTA2MDcwODAxMDIwMzA0MDUwNjA3MDgwMTAyMDMwNDA1MDYwNzA4MDEwMjAzMDQwNTA2MDcwOA=="
}
Using GCP services protected by CORE
Create an external key in GCP
See here for more information about the GCP console.
-
Access the Google key management system:
-
Click Cryptographic Keys in the menu on the left.
-
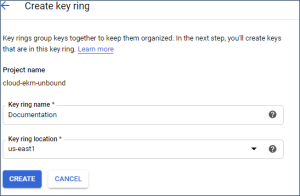
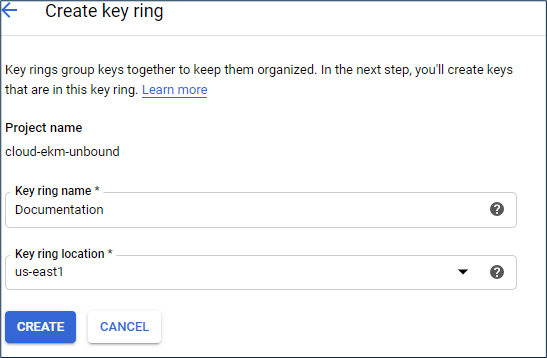
Create a new key ring by clicking +CREATE KEY RING.
-
Add key ring name and key ring location and then click CREATE.
-
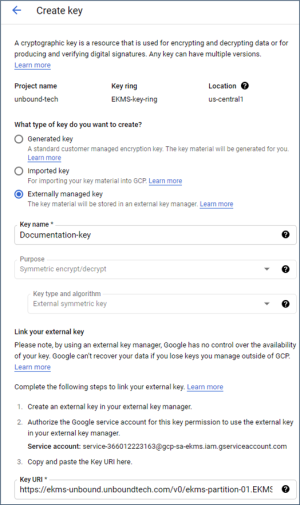
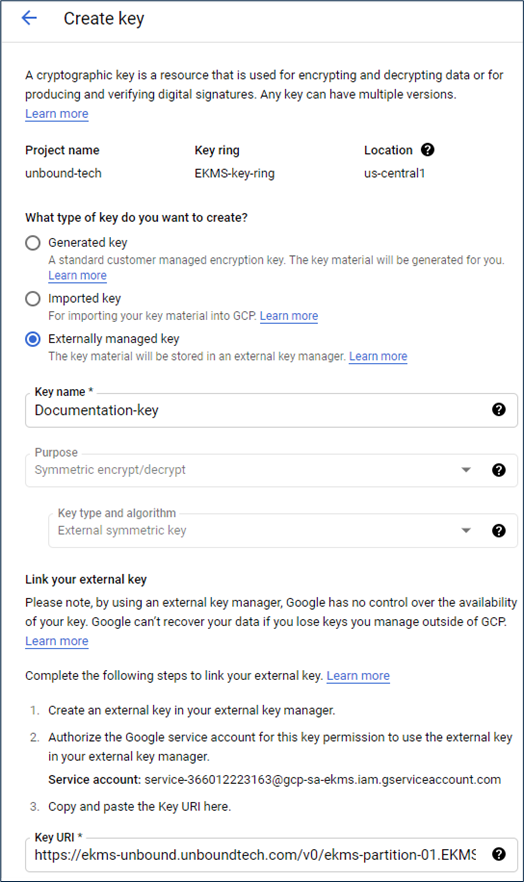
In the screen that appears, select Externally managed key.
-
Enter a key name.
The Purpose is automatically set to Symmetric encrypt/decrypt and the Key type and algorithm field is set to External symmetric key. These values cannot be modified.
-
Enter the URL for the CORE-EKM
Enterprise Key Management - previous name of the product. or the load balancer. For example:https://<ACCESS-URL>/v0/<PARTITION-NAME>.<KEYNAME>
-
Click CREATE.
-
You should see the key created:
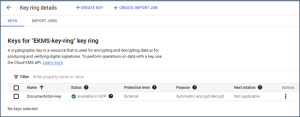
-
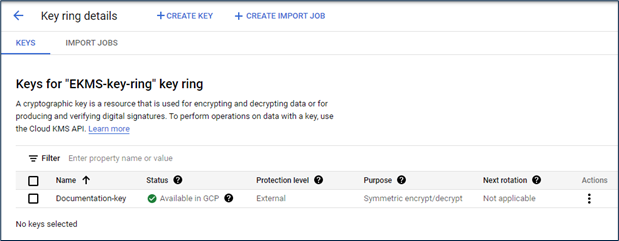
Protect BigQuery data
For this section, see the Google documentation for detailed descriptions of each of the following actions.
https://cloud.google.com/bigquery/docs/quickstarts/quickstart-web-ui
Create a query:
-
Access BigQuery.
-
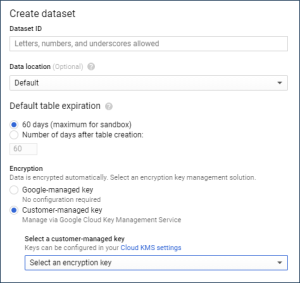
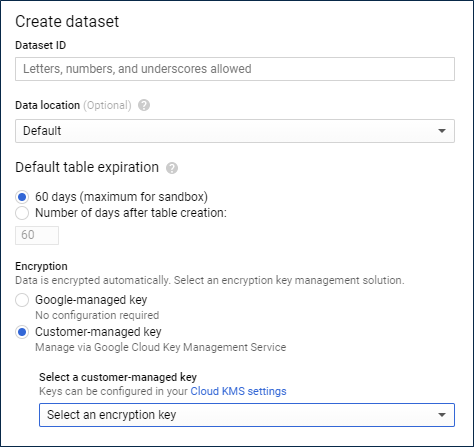
Create a dataset. Note that you need to select Customer-managed key during this process.
-
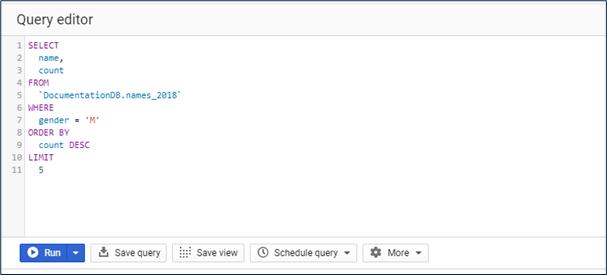
In the GCP console, enter a query in the Query Editor. For example:
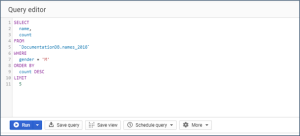
-
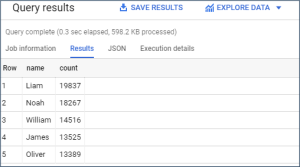
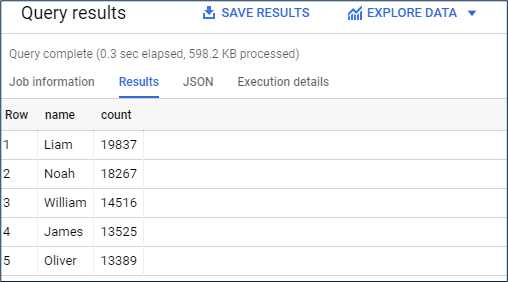
Click Run.
The query results are displayed. For example:
Check that GCP relies on the CORE key
The following procedure disables the CORE key to verify that it is needed by GCP.
-
In the CORE web UI, access the Keys and Certificates screen.
-
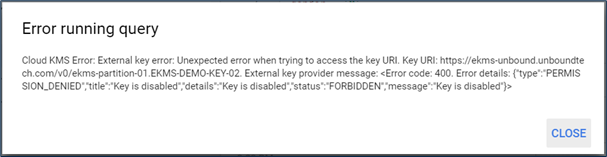
From the menu to the right of the key name, select Disable.
-
In the BigQuery console, run the query again. You get the following error showing that GCP cannot access the database without the CORE key.

Golden Environment Architecture
This section describes the system architecture used to implement CORE-EKM![]() Enterprise Key Management - previous name of the product. with the Google Cloud EKM
Enterprise Key Management - previous name of the product. with the Google Cloud EKM![]() Enterprise Key Management - previous name of the product.. It is one possible implementation of the system.
Enterprise Key Management - previous name of the product.. It is one possible implementation of the system.
The implementation has the following benefits:
-
Complete key control - the cluster is split between Google and another provider (AWS in this case).
-
High availability (“HA”) on both region and global level.
-
Low latency on region and global level.
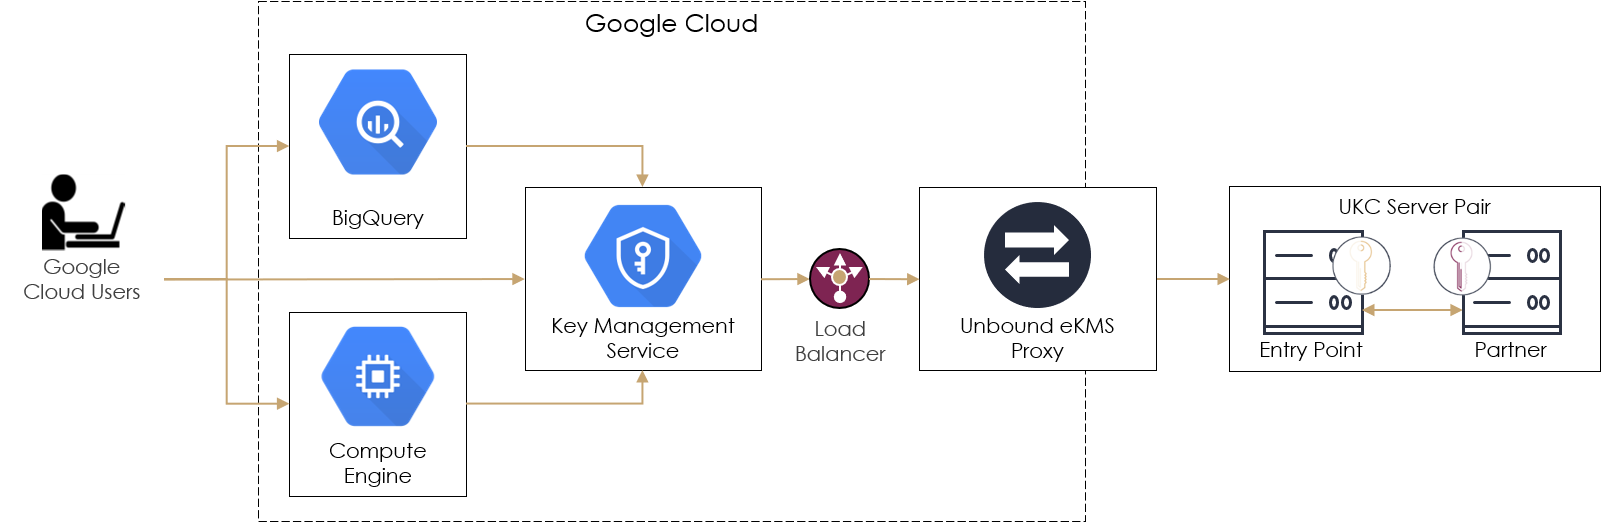
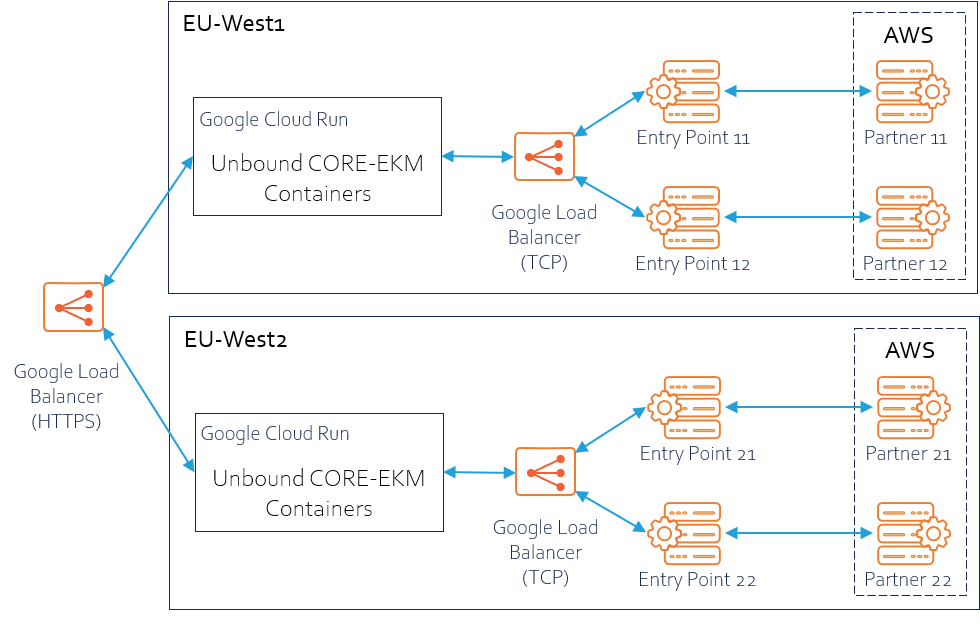
The system architecture is shown in the following figure:
Note
We use European regions in the example to demonstrate multi-region support, but any locations and number of regions can be used.
The architecture has these components (from left to right in the figure):
1. Load balancer – for HA, two separate Google regions are used. The load balancer sends requests to them.
2. Unbound CORE-EKM![]() Enterprise Key Management - previous name of the product. containers – each container instantiates a CORE-EKM
Enterprise Key Management - previous name of the product. containers – each container instantiates a CORE-EKM![]() Enterprise Key Management - previous name of the product. image. The number of CORE-EKM
Enterprise Key Management - previous name of the product. image. The number of CORE-EKM![]() Enterprise Key Management - previous name of the product. instances can auto scale using Cloud Run in each region. The CORE-EKM
Enterprise Key Management - previous name of the product. instances can auto scale using Cloud Run in each region. The CORE-EKM![]() Enterprise Key Management - previous name of the product. receives the Google Cloud request and sends it to the Unbound CORE.
Enterprise Key Management - previous name of the product. receives the Google Cloud request and sends it to the Unbound CORE.
3. Load balancer – handles requests from CORE-EKM![]() Enterprise Key Management - previous name of the product. to the Unbound CORE.
Enterprise Key Management - previous name of the product. to the Unbound CORE.
4. Entry Points – Unbound CORE is comprised of an Entry Point and a Partner server. Two instance groups are used in each region for Unbound Entry Points.
5. Partners – two Partner servers are created in AWS to provide HA on a global level.
To set up this architecture the following high-level flow can be used. A sample script, called unbound-core-google-cloud-setup.sh, with this information can be downloaded from here.
-
Create a virtual private cloud (“VPC”).
Create two separate VPC’s in two different regions.
-
Update the firewall, if needed.
Update the firewall to allow access to the networks created in the previous step.
-
Create the instance-templates and instance-groups.
-
For each region, create an instance template for the entry point and an instance template for the partner.
-
For each region, create an instance group for the entry point and an instance group for the partner. Add a named port to the instance-groups.
-
-
For each region, add a named port for each entry point and partner.
-
Reserve external IP addresses for the load balancer for the instance groups.
-
Create a health check for the load balancer. See here.
-
Create a backend service that will be used as a load balancer for the entry point and another for the partner. See here.
-
For each region, add the entry point and partner as backends to the backend services.
-
Create a URL map to route the incoming requests to the appropriate entry point backend services.
-
Create Google-managed SSL
Secure Sockets Layer - a cryptographic protocol that provides communications security over a computer network. certificates for the entry points. -
Create a target HTTPS proxy to route requests to your URL map.
-
Create two global forwarding rules to route incoming requests to the proxy.
-
Send traffic to the instances.
-
Create DNS records. Check that the DNS was updated by checking the addresses.
-
Confirm that the certificate resource status is ACTIVE (after DNS is ready) by listing the certificates.